Setup WireGuard VPN with piVPN

One of the most secure ways to remotely access your LAN is via a Virtual Private Network (VPN) connection. A VPN encrypts all of your network traffic from your device, until it reaches the LAN. This is especially useful when you are managing a server on that LAN, or wanting privacy when using public WiFi.

In order for a VPN connection to work, your must have an un-proxied “A Record” pointing to your network (acting as the public DNS). Otherwise, the VPN will fail.

PiVPN provides an easy setup for two types of VPN: WireGuard, and OpenVPN. WireGuard is one of the newest VPNs out there, and is extremely lightweight since it was written on only ~3000 lines of code. Since it is so lightweight, mobile devices benefit from this by using less battery when connected. Alternatively, OpenVPN is the industry standard. It has been around forever, and can be customized to your need. For this guide, I’m going to show you how to setup a WireGuard VPN.

Setup

Devices/ Applications Used

  1. Raspberry Pi
  2. PiVPN with WireGuard
  3. Cloudflare
  4. DDClient (optional)

The Guide

  1. Update your device
    sudo apt-get update && sudo apt-get upgrade -y
  2. Set a static IP address to your device.
  3. Log onto your domain provider (Cloudflare), and create an “A record” that points to your domain. This record will serve as your public DNS to support the connection. For this guide, I will use test.aaronridgeway.com. In order for the DNS record to serve as a public DNS, you will need to ensure the proxy is turned off (DNS only).
  4. On your device download PiVPN
    sudo curl -L https://install.pivpn.io | bash
  5. When you get to the static IP question, select Yes if you’re using DHCP reservation, otherwise select No.
  6. Select a local user to hold your VPN configurations. (I recommend selecting a user other than pi.
  7. Select WireGuard as the VPN.
  8. Set the default port to 51820.
  9. If you have Pi-Hole installed, then you will get asked if you want to integrate with the application. Since I have it setup already, and love it, I will select Yes.
  10. Enter the public DNS that you created in step 3.
  11. Select Yes for the rest of the prompts and success! You have setup your very own VPN. Now let’s add some users.

Adding Users

  1. Type in pivpn -a to add a new user.
  2. Enter the name of the client you want to add. I include a name and device name to make managing configs easier.
  3. Add the .conf file, located in /home/[pivpn user]/configs, to the computer you want to connect from, via a WireGuard VPN client.
  4. For mobile devices, you can add the config file via a QR code by typing pivpn -qr and selecting the user. You will need to download the WireGuard app to connect to the VPN.

Considerations

Your Public IP address will change over time. If you don’t have a static Public IP address, you will need to config a dynamic DNS (DDNS) to ensure the IP address stays accurate. Additionally, there are two types of VPN configurations to choose from: TAP and TUN. WireGuard VPN only offers a TUN configuration, whereas OpenVPN offers both a TAP and TUN. Lastly, the VPN connection will only be as fast as the Network Interface Card (NIC) you are using. If your device only has 10/100 Mbps, then the connection will be slower than 100 Mb/s.

Lock Down Your Exposed Server

Do you have a server running on your computer that you access outside of your home network? Is it locked down? If not, what’s stopping someone else from accessing it? An IP address is not obscure enough to deter threats.

The internet is full of bots that crawl the internet, scanning for open ports at all hours of the day. Within minutes of searching shodan.io, you can generate a report listing several public IP addresses that don’t have any authentication protecting them. What are the chances that your IP appeared was on someone’s report? Would it really be considered “hacking” if there was never any authentication, authorization, or encryption method in place? So how can we fix this?

Methods To Secure Your Server:

  1. Deploy a Virtual Private Network (VPN). A VPN allows you to create a “tunnel” back to your home network, encrypting your traffic until it reaches the network. With this approach, you would only need to expose the one/two VPN port(s), and you can access your servers. This method physically reduces the next of vulnerabilities as you would no longer need an open port for each server. This method uses public key cryptography where keys are configured for access. The challenge with this approach is that in order to access the server remotely, you must already have the VPN tunnel setup on the remote computer.
  2. Incorporate Two Factor Authentication (2FA). 2FA provides an additional layer of security, by requesting a randomly generated pass code to be entered, which is sent to your device or authentication app. In order to log into a server that has 2FA enabled, you would need both the user credentials to log on, in addition to the 2FA code. Unless the hacker has access to the account, app, or recovery codes, you can rest assured that 2FA will virtually stop any unauthorized access. This is one of the most commonly used authentication methods that I use to protect myself. If the app/ website has the capability, then you can bet that I have it enabled.
  3. Incorporate TLS certificates. These certificates provide authenticated access only to those who have them. They leverage public key cryptography which consists of public/ private key pairs. You can tell if a site leverages TLS certificates by checking the beginning of the URL for https (the S stands for secure). Home servers can leverage TLS certificates in cases where they are connected to a proxy server (like cloudflare), or a firewall. That way, even though your port is exposed on your router, no access will be granted as the guest does not have the certificate.
  4. Lock down your server with Cloudflare Access. If you have a domain pointing to your server, then you can leverage Cloudflare’s “easy” VPN alternative. By placing your trust in the company, it can protect your server with federated authentication that enables only user’s with the specified accounts access.
  5. Leverage username/ password authentication. Most servers have this capability out-of-the-box. It’s simple enough to enable and can deter a lot of threats. With this, you’d need to consider the complexity of your credentials, or else you could be susceptible to dictionary or brute force attacks.
  6. Whitelist your remote public IP address. If you know the public IP address of where you’d connect from remotely, then you can add that IP address to a whitelist so that traffic can only come from the approved IP addresses on that whitelist. Be careful though as someone can still spoof your IP address. Unless you have a static public IP address, this approach can be hard to manage.

There are many different ways to mitigate the threats to your server. As long as you have at least one method of authentication enabled, then you will stop the random internet troll from “hacking” you.

Host Your Minecraft Server as a URL

You’ve setup a local Minecraft server that you and your friends are using to play. One day your public IP address changes and now no-one can get on. To fix this, you google your new public IP address, share it with them, and everyone is happy again. What if there was a better way? What if you could just give your friends a URL and centralize the IP address management to one location? Well thankfully its possible; and we can automate the IP management so you never have to worry about and outage again.

Owning your own domain opens you up to a world of possibilities. One of those possibilities is simplifying the way your friends connect to your game server. The assumption I am making with this guide is that you have already opened the port on your router and you already own a domain. With that said, lets get started.

Create an “A” record and a “SRV” record

Within the DNS settings of your domain, you will need to create two records: an A record, and a SRV record. An A record maps the domain to an IP address (your computer). Whereas, a SRV record points a port to the A record, which removes the need to append a port to the end of your URL.

You can name your A record anything as we will use it as a subdomain. For this example, I am using “minecraft” as the A records name, which translates to minecraft.aaronridgeway.com. Enter your public IP address to be used in the translation. The SRV record is a little more tricky.

A Record

Select “SRV” as the new type of record to add and enter the following:

  • Name: “minecraft” (name of your A record above)
  • Service: “_minecraft”
  • Protocol: TCP
  • TTL: Auto
  • Priority: 0
  • Weight: 0
  • Port: 25565 (the port you’re using to access your server)
  • Target: The full URL address that you’re using for your server

It should look something like this:

SRV Record

That’s it! Now update your address in Minecraft and you’re good to go!

Automate the Updating of your Public IP address

So now our friends can log into our server via the URL. But we’re still prone to outages when our Public IP address changes. How can we fix this? We can solve this headache with a Dynamic Domain Name Server (DDNS). To setup DDNS on your sever, check out my guide on how to configure DDNS with Cloudflare.

Setup DDNS with DDClient and Cloudflare

A Dynamic DNS can save you a lot of time, and headaches, when trying to figure out why you can’t access your server from the URL. Although not often, I’ve had several occasions where my ISP changed my public IP address due to restarting/ updating my router or restarting/ changing my DNS server. Fortunately, a DDNS solves this for you by automatically updating the IP addresses on the A records within Cloudflare. So how is this done?

Setting up DDClient

Installation and setup is real easy on Debian based operating systems. We will need to install two packages: ddclient and Perl module for IP validation.

sudo apt-get update && sudo apt-get upgrade -y
sudo apt-get install ddclient libdata-validate-ip-perl

Running the command above will open an installation wizard. Skip through the entire prompt (we will configure our file later). For DNS Service Provider, select “other”, and for Dynamic DNS update protocol select “dyndns2” (its the first entry). Now we will configure the dynamic part of the DNS, in terms of seconds. Type:

sudo dpkg-reconfigure ddclient

Select “No” for Run ddclient on PPP connect? Select “Yes” for “Run ddclient as a daemon? Leave 300 (seconds) for the default time for the Interval between ddclient runs question.

We want to keep the interval at 300 because ddclient will throw soft errors for anything faster than that. Once its all setup, and the high of a newly configured app passes, you won’t notice any delay at all in updating your domain anyway. Other DDNS clients will send out packets almost every second, which just adds unnecessary traffic.

Configuring the /etc/ddclient/ddclient.conf

Use the following command to open up your DDClient configuration file.

sudo nano /etc/ddclient/ddclient.conf
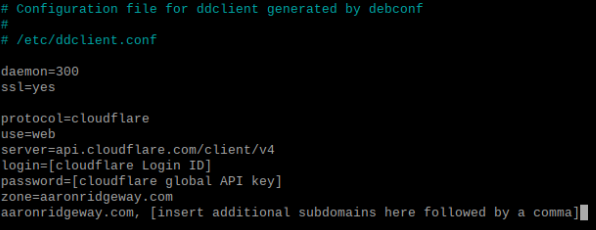
Example ddclient.conf file to connect to Cloudflare.

Setup your file the same way, modifying the sections with the [brackets].

  • login= enter your login credentials to get into Cloudflare.
  • password= enter your Global API key here. You can find your Global API key by clicking on “My Profile” in the top right of Cloudflare, and then by clicking on “API tokens”.
  • zone= type in the cloudflare zone you want to update (see below).
  • Enter the A records that you would like to update on the last line.
Cloudflare Zone

Testing the Connection

Testing your Public IP

sudo ddclient -query
Query output.

Confirm that both the Local and Public IP addresses are accurate. To confirm the Public IP address, you can type “what’s my IP” directly into Google.

Testing your connection to Cloudflare

sudo ddclient -daemon=0 -verbose -noquiet -force

You will get a lot of text but at the end of it you should a message similar to:

SUCCESS aaronridgeway.com — — Updated Succesfully to [PUBLIC IP Address]”

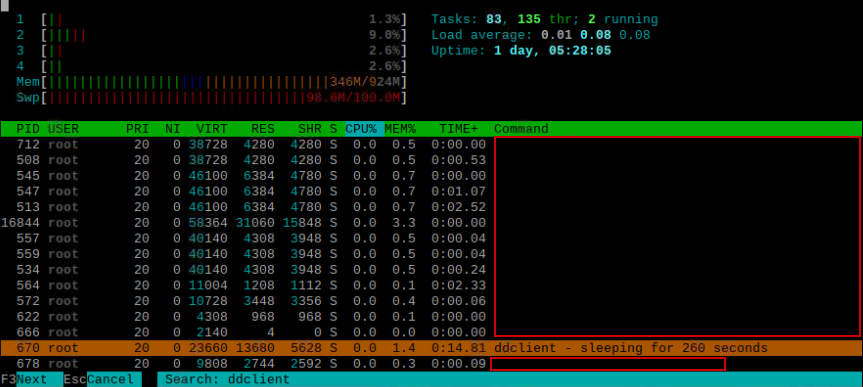
Validate that DDClient is running every 5 minutes

To do this, run the following command

htop

That command shows all of the processes that are currently running. Check the list for ddclient. If you don’t see it, you can search for it by pressing F3.

If you see ddclient in your list, then sucess! You’re all set up with DDClient and Cloudflare!

Additional notes

Adding new subdomains to DDclient

Its a quick 2 step process!

  1. Update the ddclient.conf file with the new subdomains on the last line of the file.
  2. Force an update to skip the wait!

Forcing an update

There may come a time when you need to manually update your IP address, for either troubleshooting or to add a new site to be managed.

sudo ddclient --force

Helpful references

  • https://sourceforge.net/p/ddclient/wiki/Home/
  • https://jacobjangles.com/free-ddns-using-ddclient-and-cloudflare/
  • https://blog.jswart.xyz/posts/cloudflare-dynamic-dns/
  • https://mirrormirage0.medium.com/configuring-dynamic-ip-auto-update-for-custom-domain-name-alternative-to-dyndns-noip-etc-57a1e100efd5